Tuesday, July 26, 2011

Party Chicken


Party Chicken

My mother has made this for years and years. I always request it when I go home for a visit and it's one of my favorite dishes.  It's a great make ahead dish too!  My mother has always let this marinate in the frig for several hours.  I've let it sit in the frig and I've baked it right after making it and I can't tell a difference.  You do have to plan ahead a little because it requires 2 and half hours in the oven.

4 boneless, skinless chicken breast, sliced lengthwise in half ( to make 8 pieces of chicken)
1 jar dried beef, chopped
8 oz of sour cream
1 (10.5 oz) can of cream of mushroom soup
8 slices of raw bacon
toothpicks
salt and pepper

Preheat oven to 275 degrees F. Grease a 9 x 13 baking dish.

In a small bowl mix sour cream and soup together. Season with salt and pepper as desired. Evenly spread chopped dried beef on the bottom of baking dish. If you aren't familiar with dried beef it can usually be found near the canned meat in your grocery store.  On a flat surface lay a piece of bacon flat, place chicken breast half on top and roll together from one end to the other lengthwise. Secure with a toothpick. Place rolled chicken breast on top of dried beef. Once all of the chicken and bacon are rolled and place over dried beef, pour sour cream/soup mixture over each rolled chicken breast. Cover and bake for 2 ½ hours.

Don't forget about the toothpicks!!!


Monday, July 25, 2011

Whitney Miller's Oven-Fried Catfish with Fresh Dill Tartar Sauce


I love the TV show Masterchef!  I have a secret crush on Gordon Ramsey....shhh, don't tell anyone!  Whitney Miller was the first winner of Masterchef and just released her first cookbook."Modern Hospitality:Simple Recipes with Southern Charm".  Recently Whitney made an appearance on Masterchef with several of her recipes for the contestants to try and recreate.  This catfish recipe was chosen for all of them to copy.  It looked so good at the time, so when I got my hands on the cookbook I knew it was one of the first recipes I wanted to try. Whitney's cookbook is beautifully illustrated and her recipes really are simple with an obvious southern flare. The catfish was so yummy and very simple to prepare!


Let's get started:

Catfish

1 cup low-fat buttermilk
4 catfish fillets (about 1/2 pound each)
3/4 cup fine-grind cornmeal
3/4 cup teaspoon onion powder
1/4 teaspoon garlic powder
1/2 teaspoon lemon-pepper seasoning
1/2 teaspoon salt
1/4 teaspoon crushed freeze dried chives
Pinch of cayenne pepper
2 tablespoon canola oil

To prepare the fish: Pour the buttermilk into a shallow baking dish. Place the catfish fillets in the buttermilk and turn to coat. Refrigerate for 25 minutes.

Preheat the oven to 400 degrees F.

Combine the cornmeal, onion powder, garlic powder, lemon pepper seasoning, salt, chives, and cayenne in a shallow dish or pie plate.

Pour the oil into a large cast iron skillet and turn to coat the bottom. Place in the oven to heat for 6 minutes.

Working with 1 fillet at a time, shake off the excess buttermilk and dredge in the cornmeal mixture to coat.

Place cornmeal-coated fillets in the preheated skillet. Bake for 10 minutes. Turn the fillets and bake until golden brown and crisp, 10-15 minutes (depending on the size of the fillets).


Fresh Dill Tarter Sauce


1 cup mayonnaise
2 teaspoons stone-ground mustard
1 teaspoon grated lemon zest
1 teaspoon fresh lemon juice
1/2 teaspoon ground black pepper
3/4 teaspoon minced fresh dill
3/4 teaspoon minced fresh chives

Mix all ingredients together in a small bowl.

Serve the hot fish with the tarter sauce.


Those are Whitney's bacon wrapped brussels sprouts with the fish and tarter sauce.  See the previous post for that recipe or click on the link provided!  If you like brussels sprouts you are gonna love these!!


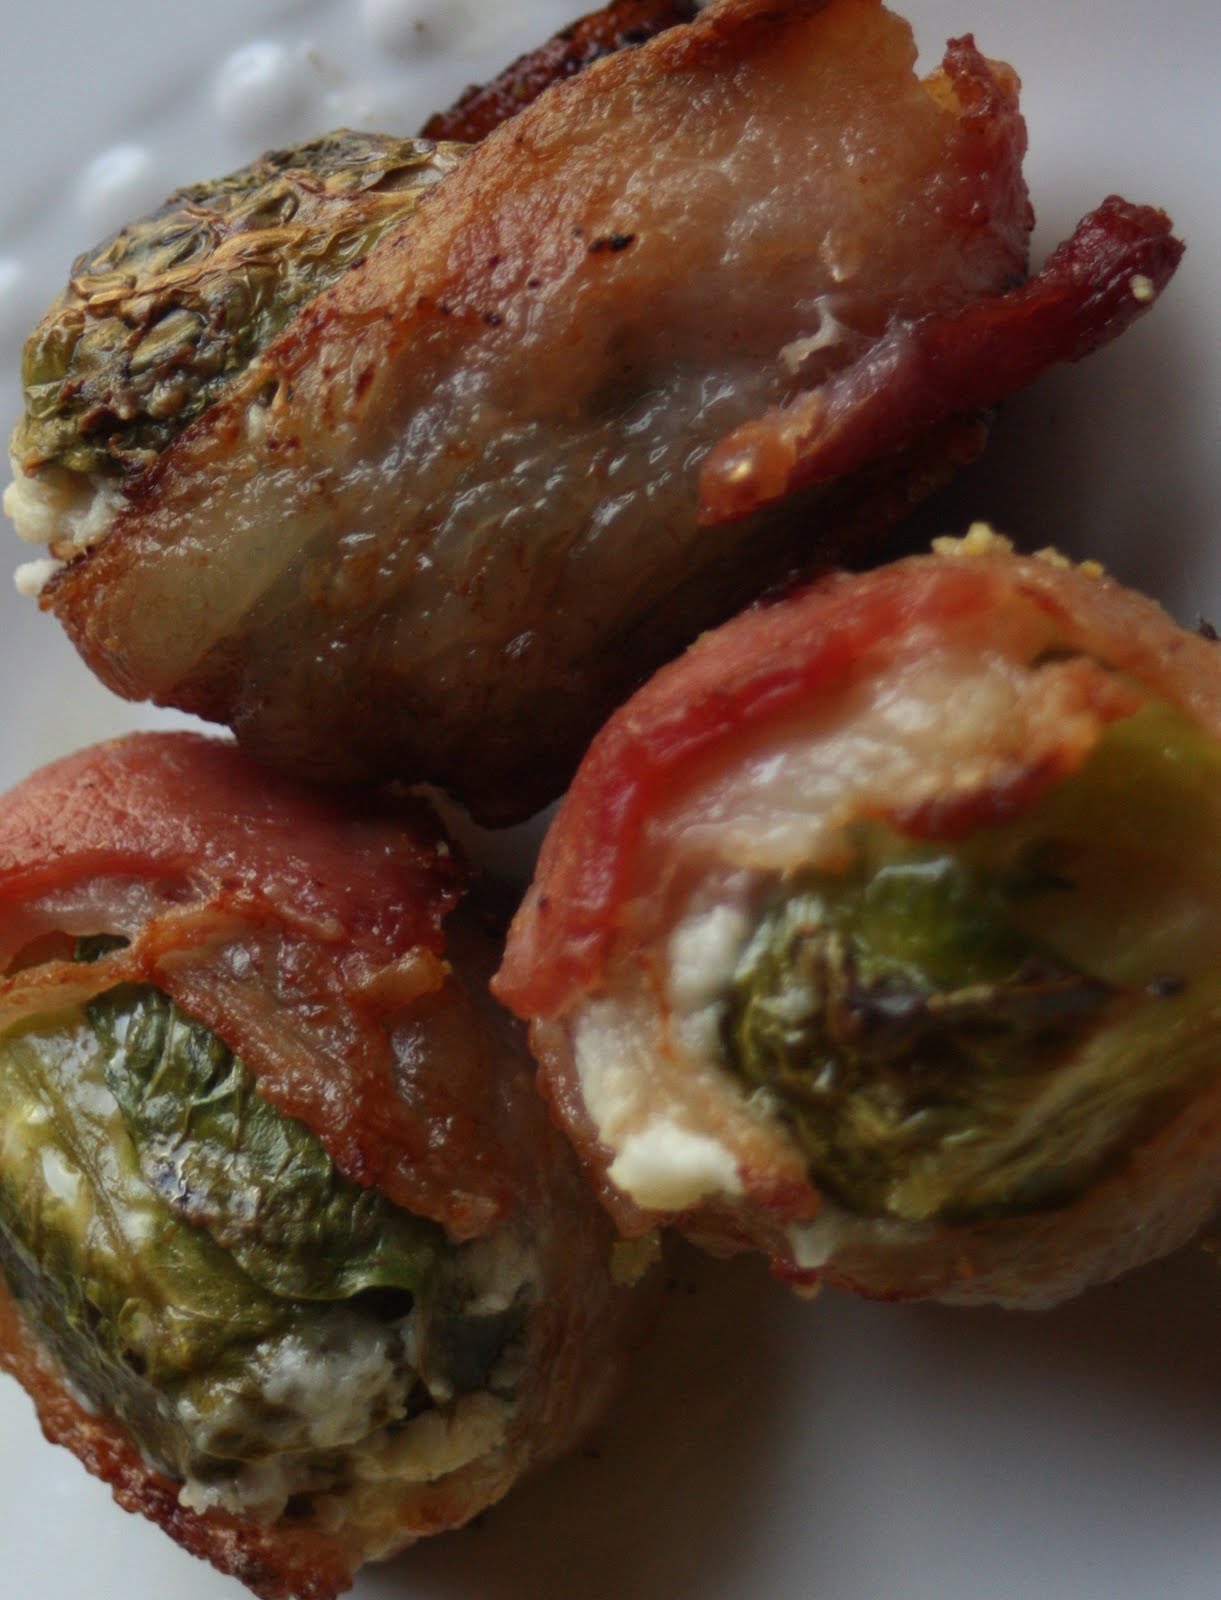
Whitney Miller's Bacon Wrapped Brussels Sprouts


I'm a huge fan of the TV show Masterchef.  Last season Whitney Miller was the first winner to become Masterchef.  I just fell in love with her on the show.  She's young, cute, southern, and a whiz in the kitchen.  She recently released her first cookbook Modern Hospitality: Simple Recipes with Southern Charm.  The recipes in her book are pretty simple and definitely southern.  If you like Brussels sprouts you are sure to love these! Whitney labels them as an appetizer but I made them as a side dish.

Let's get started:

18 large Brussels sprouts, stem ends trimmed and loose outer leaves discarded
4 ounces of cream cheese or goat cheese, at room temperature (I used cream cheese)
1/2 teaspoon minced garlic
9 bacon slices, halved crosswise
2 tablespoons extra-virgin olive oil
1/8 teaspoon ground black pepper

Fill a large pot halfway with water and bring to a boil over high heat.  Add the Brussels sprouts and cook for 2 minutes to blanch. Remove with a slotted spoon and drain in a sieve. Pat the Brussels sprouts dry with paper towels or a kitchen towel. Using a paring knife, cut an "X" in the top of each Brussels sprout, cutting halfway down through the sprout.

Preheat the oven to 400 degrees F.

Blend the cheese and garlic in a small bowl. Spoon the cheese mixture into a small resealable plastic bag. Cut a small hole in one of the bottom corners of the bag. Place the cut out corner of the plastic bag in the "X" of each Brussels sprout and squeeze in a dollop of cheese mixture.

Wrap a piece of bacon around each sprout vertically, covering over the cheese. Place on a rimmed baking sheet. Drizzle the oil over the sprouts and sprinkle with the pepper.

Bake the sprouts, flipping them over halfway through the baking time, until the bacon is evenly browned, 25-30 minutes.

I secured my bacon with wooden toothpicks before the baking process.


Simple Baked Ziti


Simple Baked Ziti

I've been making this Ziti for several years.  I believe I got the recipe from allrecipes.com., which is a great site if you want a new one to check out.  This makes a lot so prepare for leftovers unless you are feeding a small army.  It's a great meal to freeze too!  Which is exactly what I did.  My husband is in Afganistan, and my children are spending some time with their grandmother for a couple weeks.  Home alone....the silence has been golden!  A couple of days ago I'm enjoying my quiet time on the couch watching daytime TV and get the itch to cook something.  There's no one here but me and Lord knows my thighs do not need a full pan of baked ziti.  I make it and freeze it....problem solved! 

Let's Get Started:

Simple Baked Ziti


1 pound dry ziti pasta
Salt
1 onion, chopped
                                                              1 pound lean ground beef
2 (26 ounce) jars spaghetti sauce
6 ounces provolone cheese, sliced
1 1/2 cups sour cream
8 ounces mozzarella cheese, shredded (or more)
2 tablespoons grated Parmesan cheese

Bring a large pot of salted water to a boil. Add ziti pasta and cook until al dente. Should take about 8-9 minutes. Drain pasta of water. Set pasta aside.

Preheat over to 350 degrees F. Grease a 9 x 13 casserole dish.
In a large skillet over medium heat, brown ground beef and onion together until the beef is no longer pink and onions are tender and translucent. Drain grease then add spaghetti sauce and simmer for 10-15 minutes.

Layer as follows into the casserole dish:

½ of the ziti noodles, ½ of the provolone cheese, ½ of the sour cream, ½ of the sauce mixture.


I used Breakstone's Roasted Garlic and Herb for the first time in this dish and thought it was perfect.


I used a four cheese spaghetti sauce but any kind will do.  You can also add extra spices like oregano, basil, or garlic.


Repeat and top with mozzarella and Parmesan cheese. Italian cheese blend works great too.
If you are going to freeze this do not bake, cover well and freeze at this point in the process.

If not,
Bake for 30-40 minutes


   Print Here

Sunday, July 24, 2011

Jalapeno Popper Dip


Jalapeno Popper Dip

I have been dying to try this dip.  There are so many different recipes for it out there if you've ever looked, and I did!  So, I read  several and came up with my own. It's pretty yummy and quick to throw together.  Hope you like it too!

Let's get started:

Jalapeno Popper Dip

2 (8 oz) packages of cream cheese-softened
1/2 cup mayonnaise
1/2 cup sour cream
2 cups shredded cheddar cheese
1/2 cup Parmesan cheese
1 (4 oz) can chopped green chilies
1/2 cup of chopped pickled jalapenos from a jar
1 Tablespoon pickled jalapeno juice

Topping

1 cup panko bread crumbs
1 Tablespoon of dried Ranch flavored powder mix
1/4 cup (half stick) of butter-melted

Directions:

Preheat oven to 375 degrees
Lightly grease an 8 x 8 baking dish

Mix cream cheese, mayo, and sour cream until well combined in a large bowl.  Add both types of cheese, jalapenos, and jalapeno juice, stir until combined. (You can add more or less jalapenos and jalapeno juice to suit yourself.)

Spread into prepared dish.

Combine melted butter, bread crumbs, and ranch powder in a small bowl.  Mix well.  Sprinkle on top of dip.

Bake for 20-25 minutes or until cheese is melted and crumbs are golden brown.


Tuesday, July 19, 2011

Spicy Island Shrimp


Spicy Island Shrimp


This is one of my favorite shrimp dishes of all time.  I think it's similar to a shrimp creole recipe.  The original recipe I started with came from a Taste of Home recipe card but I've changed it so much over the years I don't think it's worth posting the original inspiration. I did however, keep the original name. My two older children love this dish too!  It's easy enough to tone down the hot spices for them also.  I like to add a little more cayenne for myself though!

Let's get started:

Spicy Island Shrimp

1 large green pepper, chopped
1 large onion, chopped
1/2 cup butter or margarine
2 pounds uncooked large shrimp, peeled and deveined*
2 (15 oz) cans tomato sauce
1/3 tablespoons chopped green onions**
3 tablespoons minced fresh parsley**
2 teaspoons of salt
2 teaspoons of black pepper
3 teaspoons of paprika
2 teaspoons of garlic powder
3 teaspoons of oregano
2 teaspoons of thyme
1/2-1 teaspoon of white pepper***
1/2-1 teaspoon cayenne pepper***
Cooked rice

In a large skillet saute the green pepper and onion in butter until tender.  Reduce heat and add shrimp.  Cook for about 5 minutes until shrimp are pink.


* I have used frozen cooked shrimp many times with this dish.  I usually run cold water over them until defrosted and then pat dry.  Instead of adding them once the bell peppers and onions are ready, you must add them during the last 5-7 minutes of cooking.

Stir in the tomato sauce, green onions, parsley and other seasonings. Then bring it to a slight boil. Reduce heat and simmer, uncovered, for about 20 minutes or until slightly thickened.


**I have also used dried parsley and freezed dried chives instead of fresh several times.  If this is something that you might do just reduce the amount by a 1/3.

***If you are making this for children or someone who is not fond of spicy foods reduce the white pepper and cayenne pepper.

This is one of those sauces that you can play with a lot.  If you want more oregano...add it.  Or less garlic powder....reduce it.  In that 20 minutes of simmering taste it a couple of times and increase as desired.  Start on the low end at first to be on the safe side when you add the spices. I've added basil and rosemary a few times too!  I've also substituted red, yellow, and orange bell peppers for the green ones. That is what I love about this dish.  If I'm feeling a little spicy then I just add a dash more cayenne pepper.  If you want more sauce just add another can of tomato sauce and increase your spices.  This is why I love this dish!


Saturday, July 9, 2011

White Chocolate Chip Macadamia Nut Cookies


White Chocolate Macadamia Nut Cookies

My family loves these cookies!  My friends love these cookies!  I love these cookies! They are the closest thing I've found to Subway's white chocolate macadamia nut cookies.

I crave the cream cheese chocolate chip cookies that I've listed on this blog.  They are the perfect chocolate chip cookie in my opinion.  So, as I'm stuffing my face with a few of those delicious cookies and like a bolt of lighting it hits me!  Use the same recipe and add white chocolate chips and macadamia nuts.  What I got was pure perfection!  I didn't anticipate that they would be so similar to Subway's though....but lucky me!  And you!  The texture is different than theirs.  But the taste is very close in my opinion.  I hope you like them as much as I do!

Let's get started:

White Chocolate Chip Macadamia Nut Cookies
Recipe inspired from Jenn
Ingredients:
2 1/2 cups all-purpose flour
1 teaspoon baking soda
1/2 teaspoon kosher salt
8oz package of cream cheese, softened
1 cup (2 sticks) unsalted butter, softened
1 1/2 cups packed brown sugar
1 egg
1 teaspoon vanilla
12oz bag of white chocolate chips
2 cups macadamia nuts


Preheat oven to 350 degrees F.
In a large bowl, combine the flour, baking soda, and salt. Whisk to combine and set aside until later.

Beat the cream cheese and the butter on medium speed until creamy and light, should take about 2 minutes.
Add the brown sugar and then mix well.
Scrape down the sides of the bowl as needed and add the egg and vanilla. Beat on medium speed for 1 minute.
Slowly, add the flour mixture a little at a time, until well combined.
Fold in white chocolate chips and macadamia nuts.
I suggest placing the dough in the freezer for a few hours. In my experience the cookies come out better. But, this step isn't necessary. Roll dough into walnut size balls then place on a greased cookie sheet.
Bake for 12 minutes, or until the edges are golden in your pre-heated oven. Let rest on cookie sheet for 5 minutes then move to a wire rack to cool completely.

 
Couldn't help myself!!

Print recipe here